Logiciel libre de géométrie, d'analyse et de simulation multiplateforme par Yves Biton
Toutes les versions de cet article : [English] [Español] [français]
In this article, we will use a recursive implementation of a construction (new in version 4.8).
We will first create the construction that will be implemented in a recursive way.
Start with a new figure. Make sure the angle unity is degree (menu item Options - Curent figure, tab Angle unity).
Use tool  to create a calculation named a with formula 30.
Create two free points (icône  ) we will call A and B (refer to the figure below), with A left of B (In fact no use to really name these points).
Create the image of point B through the rotation of center A and angle 90°. We will call this point C. Then use tool ![]() to create point D image of C through the translation of vector AB (clicks on A, B and C in that order).
to create point D image of C through the translation of vector AB (clicks on A, B and C in that order).
Use tool  to create point E image of D through the rotation of center C and angle a (Click first on center C, entera for angle, the click on D) then tool
  to create the half line startig from C and going through point E.
Now create the midpoint of segment [CD] (tool  ) then the cricle with center this milieu and going through point C (tool
 .
.
Wo now have to create the objects which will be the final objects of our construction.
Out construction will call itself a first time for points C and F then F and D, therefore we must have 3 points starting the final objects of our construction.
Use menu itemCreate - Object clone to create a clone of point C. This will be our first final object.
Now with the intersection tool  create the intersection point of the half line with the circle. We will call this point F. It will be our second final object.
Once again use menu item Create - Object clone to create a clone of point D which will be our third final object.
In the color palette, get the blue color activated, then use tool  to create polygon ABCD (right click to create the polygone when the four points are clicked on, choose clones of C and D, but this not necessary). The use tool
  to create a surface with this polygon as edge.
I the same way, get the brown color activated then create polygon CFD (choose clones of C et D for instance) the fill this polygon with a surface.
Our figure is ready to create our construction.
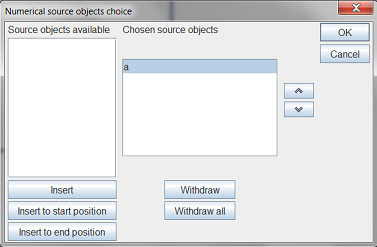
There is only only numerical source object which is the angle a of our rotation.
Use menu item Constructions - Sources objects choice - Numerical and double-click in the left list on a to get it inserted in the right list just as below.
Now use menu item Constructions - Sources objects choice - Graphical and click on on A then on B (the click order est important). Right click to end.
We must now indicate the final objects which all will be graphical. The click order is not important : It is the creation order that counts fo the recursion to be possible.
Use menu item Constructions - Final objects choice - Graphical then click on clone o C, point F, clone of C, the two polygons and the two surfaces surfaces. Right click to end.
For our figure to be smarter, we will mask the final points (only the polygons and surfaces will be visible).
With tool  mask the clones of C and D and point F.
Now use menu itemConstruction - Finish current cosntruction and enter Tree for the construction’s name, for example.
Save your figure in a file on disk.
We will now save the construction we just created in a file on disk. For this use menu item Constructions - Save construction of figure to file and save this construction in Arbre.mgc file on your computer.
Now create a new empty figure and make sure that he angle unity is degree.
Create two free points we will call A and B (icon ) with A left of B.
Use menu item Construction - Incorporate construction in figure from file to iincorporate in this new figure the Tree construction you saved before in a file.
With tool  , create a cursor in the topleft corner of the figure filling the dialog bow as below.

With icon  , capture the cursor to get a value of 40° for ang.
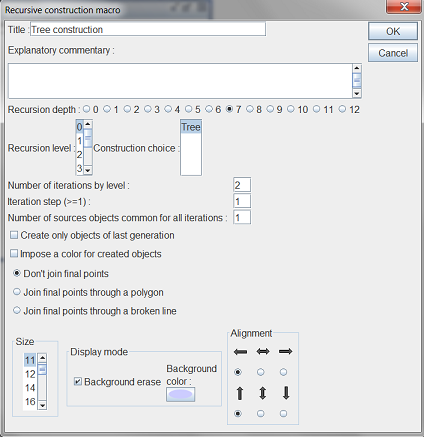
We will now create a macro which will implement the construction Tree in a recursive way.
Use menu item Macros - New macro - Construction - Recursive. Fill in the dialog box as below.
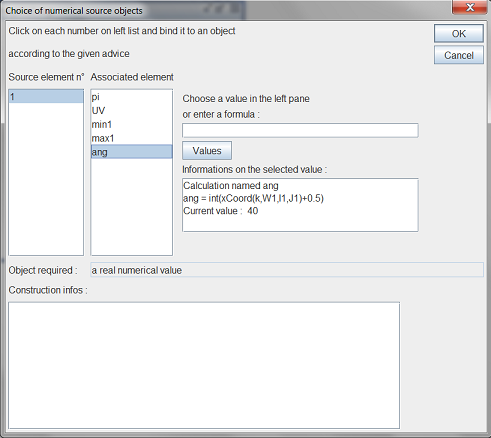
Sine a source object is ommon for all the implementations, a dialog box pops up to ask for this common object (it is a numerical object). Fill the dialog box in as below.
In the inidcation line at the boottom of the frame ou are noow asked to click on two points. Click on points points A and B.
The macro macro appaears.
Now save your figure in a file before executing the macro.
Now use the execution macro tool  and click on Tree construction macro. The Pythagora tree appears.
You can use the cursors to make the angle vary and also cature points A and B : The tree is dynamic.
Below, click on the macro to get the tree constructed the modify the angle and capture A and B (This figure is animated through JavaScript, it is not as fluid as in MathGraph32).
 Accueil
 Présentation
 FAQ
FAQ Contact