Logiciel libre de géométrie, d'analyse et de simulation multiplateforme par Yves Biton
Toutes les versions de cet article : [English] [français]
JavaScript of MathGraph32 allows the user to insert very easily a figure in a document of your word processor with respect of the dimensions in centimeters.
For this to be possible, your figure must include an unity length.
You can create a new figure via icon  by choosing :
– Either a figure with a frame (O ;I,J) : in this case, length OI is the unity length of the figure.
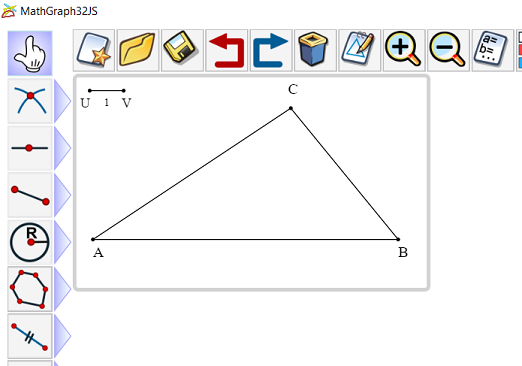
– Either a figure without frame with an unity length. In this case a segment [UV] stands on the top left corner of the figure. it’s length is the unity length of the figure.
If you have worked on a figure without an unity length you can define it afterwards by expanding the toolbar on the bottom left and clicking on icon
(icône  and choosing item Create unity length.
If your figure already has an unity length and you want it to be replaced by another one, use tool  of the upper toolbar to delete this unity length, then proceed as shown above to choose a length as new unity length. But beware : al the objects depending on the old unity length will be deleted as well.
For our example, very simple, we will create a triangle with dimensions of 9, 7 and 5.
Use icon to create a new figure without frame and with unity length.
Expanding the points toolbar, click on icon  to create a free point and name it A (On the bottom left side of the figure).
Exanding the lines toolbar, use icon  to create the horizontal line geing through point A.
Expanding the circles and arcs toolbar, use icon  to create the circle of center centre A and radius 9.
In the points toolbar, use icon  to create the intersection between the line and the circle. A point appears on the right side of point A fet it named B (another point is also created but ouside our view).
Use tool  to get this first circle hidden.
Again use icon to create the circle of center A and radius 7 the the circle of center B and radius 5.
Use tool to create the intersection of these two circles and name C the intersection point that lies above the line. No use to name the second intersection point.
Use tool to hide the two last circles , the second intersection point and the horizontal line.
Use icon  to create 3 segments joining points A, B et C.
To be noticed : Capturing point V you can increase or decrease the unity length and thus increase or decrease the size of the triangle.
Now use tool  to move point A suche as the triangle position is on the top left corner of the figure.
Now we are going to proceed for exporting only the portion of the figure near the triangle.
For this, in the upper toolbar use icon ![]() (figure options choices).
(figure options choices).
In the dialog box popping up, check the checkbox Use a frame of given dimensions and validate by OK.
A grey frame appears around the figure.
With capture tool , drag the bottom right corner of this grey frame to tighten the frame around the triangle just as underneath.
Now let us explain how to export our figure in a word processor such as our unity length will have a real length of one centimenter
Use export icon  in the upper toolbar and choose item Copy figure in clipboard with length unity .
A first dialog box appears :
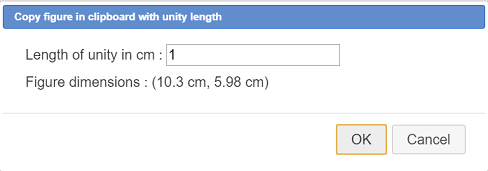
Here wo chose 1 as real length for the unity length of the figure in cm.
Just under we can see what the dimensions of the figure will be.
Entering 0.5 instead of 1 in the edit field, our figure would be reduced by 50 % (1/2 scale).
To be noted :The dimensions indicated are computed according to our grey selection rectangle around the triangle.
Now rendez-vous in your favorite word processor.
You only have to paste the clipboard where you want in your document.
Under Free-Office, jour image may not have the wished dimensions.
In this case, in the dialog box where you indicate the lenth of the unity in cm, take note of the width indicated under the input. In Free-Office, paste the figure then right click on the image. Check the checkbox Preserve Ratio and enter in the Length edit field the width obtained from the dialog box.
Dans ce cas, dans la boîte de dialogue de choix de la longueur unité en cm, notez la largeur de la figure en cm, une fois la figure collée dans Libre-Office, clic droit sur l’image, choisissez Propriétés, onglet Type. Cochez la case Conserver le ratio et entrez dans le Champ Largeur la largeur que vous aviez notée.
Beware : If your figure is too big to fit in, the word processor will automatically reduce it and the wished length in cm will be reduced. In this case, right click on the inserted image to see if the image is really 100% displayed.
Note : : You can also save your figure in a PNG file with information on the unity length using icon and choosing item Export in PNG file with unity.
 Accueil
 Présentation
 FAQ
FAQ Contact