Toutes les versions de cet article : [English] [français]
This article will explain how to create an Hilbert fractal with MathGraph32.
For this it is better to use JavaScript version of MathGraph32 (version 6.4.5 ou more recent).
The base idea is to start from three free points A, B and C as shown underneath.
Starting form these points A, B et C, have been created, in this order, (the creation order is important) :
For instance, point D is the image of C through dilation of center A and ratio -1/4.
The following points have beeen created using translations.
After these points has been created polygon DEFGHKLMNOPQRSTU and a surface delimitated by this polygon.
The idea is to create a macro-construction taking points A, B et C as sources objects and points D, E, F, G, H, K, L, M, N, O,P, Q, R, S, T, U as final objects. These points will be hidden in the final figure for the figure to be nicer.
This macro-construction beeing a little fastidious to create, you can download it in the zip file underneath.
with the figure below, the idea is to re apply the construction to points D, E and F, then to points H, K and L, then to points N, O and P then, finaly, to points R, S et T.
So we get the following figure (recursion level of 1) :
Now create a new figure without frame and without unity length via icon  of the uper toolbar.
Use icon ![]() of the upper toolbar to get the addon toolbar visible.
of the upper toolbar to get the addon toolbar visible.
Click on icon  and choose Incorporate construction from file.
Go and fetch Hilbert.mgc macro construction you have downloaded above and validate.
This construction is now available in our figure
Create two free points we will name as A and B (icon  ).
).
The create segment [AB] (tool  ), the line perpendicular to this segment going through B (tool
  ), the cercle of centre B and going through A (
 ), the intersection of this circle with the perpendicular line (
 ).
).
Nommez C the intersection point that lies upon segment [AB].
Now, with tool  , mask the segment, the perpendicular line, the circle and the interection point which is not C.
Expand the display toolbar and cllick on icon ![]() (creation of a nex macro).
(creation of a nex macro).
In the list, click on Recursive construction macro and validate.
Click on the top left corner of the figure to indicate the place macro title is to be displayer at.
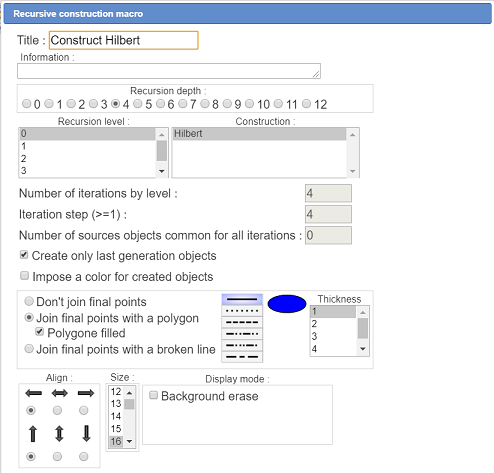
A dialog box pops up. Fill it as underneath then validate.
Don’t forget, once the dialog box validated, to click on points A, B and C which are the three sources points used for the first implementation of our macro-construction.
The title of our macro is now available on the figure.

At this point, it is better to save your figure in a file..
Now activate in the upper toolbar ![]() and click on the macro title to get it executed.
and click on the macro title to get it executed.
You get this figure :.
You can see the figure is still dynamic : You can capture points A and B.
To be noted : The figure fluidity will be better with Chrome navigator than FireFox and more fluid with Firefox than Edge.
Some explanations relative to the recursive macro construction dialog box.
As seen before, during the construction, the macro-construction Hilbert must be implemented four times on each iteration.
When we implement the macro construction Hilbert for the first time (refer to the figure on top of the page), applied to points D, E and F, we must the jump to points H, K and L. To jump form D to H, we have to jump over four of the fonal objects created by the macro-construction.
Thus the value of 4 for the iteration step.
We only create the last generation objects and we ask for thle to be joined by a polygon filled with a surface.
Be careful : If ou save your figure in a file after the execution of the macro, the file will be much bigger.
If your computer is powerful enough, cancel the execution of the macro and use tool  (graphical object modification), click on the macro title et and set the recursion depth to 5.
You ca download the figure underneath :
Here is a figure with a recursion depth of 5.
With such a recursion depth, the Hilbert construction is applied $4^5=1024$ times !