Logiciel libre de géométrie, d'analyse et de simulation multiplateforme par Yves Biton
Toutes les versions de cet article : [English] [Español] [français]
In this article I will show you how to create a macro construction to get graduations on an axis with fractions of type a*pi/b, where a and b are two integers strictly positive.
If you only want to see how to use this construction you can jump to the end of this article.
Our construction will take for sources objects :
With icon  , create a new figurewithout frame and without unity length.
With icon  , create two free points we will refer to as O and I (no need to really name them).
With  the following real calculations :
| Calculation name | Formula |
| a | 2 |
| b | 3 |
| mini | -7 |
| maxi | 9 |
| nbgrad | maxi - mini + 1 |
We will use two object locuses generated by a linked point and this linked point will be got from a cursor.
Use icon  (cursor creation).
Click on the top left corner of the figure and fill in the dialog box as shown underneath :
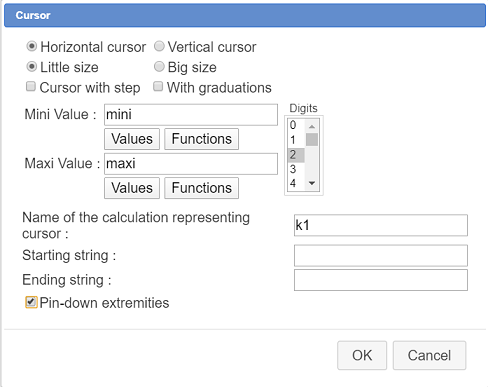
Beware : The cursor must not be with integer values because if so it will not be represented by a point linked to a segment.
With create the following real calculations :
| Calculation name | Formula | Explanations |
| k | int(k1+0.5) | k represents the integer value nearest k1 |
| g | gcd(abs(k*a),b) | g represents the gcd of absolute value of ka and of b |
| num | a*k/g | Represents the simplified numerator of the fraction |
| den | b/g | Represents the simplified denominateur of the fraction |
| calc | num*pi/den | Represents the abscissa of the current point |
| knul | k=0 | Will return 1 if k value is 0 and 0 otherwise. Will be used not to display the fraction when the value is 0 |
Now use icon  to create a function of real variable pi named fcalc with this formula :
num*pi/denas shown here :
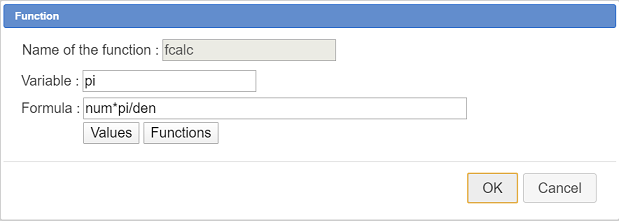
This function will be used in a LaTeX display by asking for it’s formula display. Naming the variable pi will make this LaTeX display use the real character π instead of an approximate value of pi if we used a real calculation instead of a function.
Now we will create a point of ascissa calc relatively to points O and I.
Activate icon (dilation).
You are first asked to click on the center of the dilation : click on point O.
Then you are asked for the dilation ratio : choose calc.
Then you must click on an object to get it’s image through the dilation : click on point I.
Now let’s create a LaTeX display linked to the last point created.
activate icon .
.
First click on the last point created (the image point). Thus the LaTeX display will be linked to this point.
Then fill in the dialog box as shown underneath :
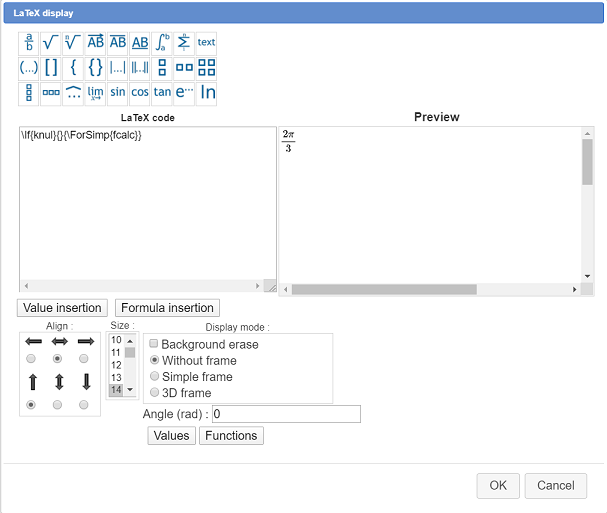
Here is the LaTeX code used :
\If{knul}{}{\ForSimp{fcalc}}This LaTeX LaTeX uses a LaTeX code specific to MathGraph32 with this syntax :
\If{test}{Code to display if test value is 1}{Code to display if display value is not 1}
Thus, if k value is 0, nothing will be displayed and otherwise we will display the fraction of pi matching the formula num*pi/den.
Be careful with the alignment : Horizontally centered and aligned under the point vertically.
Now expand the locuses toolbar and activate icon  (object locus genarated by linked point).
First you are asked to click on the object traces of which will generate the locus : click on the last point (point image through dilation).
Then you are asked to click on the linked point positions of which will generate the object locus : click on the mobile point of the cursor (which is blinking).
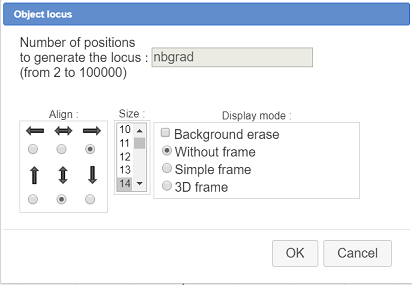
Then a dialog box pops up asking for the numer of objects of the locus. Fill it as shown here :
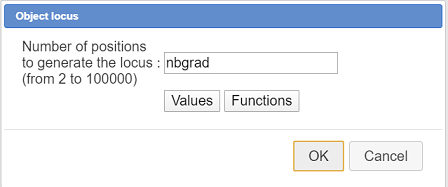
The number of object of the locus is given by the calculation nbgrad.
In the same way we are going to create an object locus of the LaTeX display.
Again activate icon .
For object generating the locus, click on the LaTeX display which starts blinking.
In the same way click on the mobile point of the cursor and specify nbgrad for the number of objects.
The object locus appears.
At this point you could save your figure in a file as a security measure. Our figure is ready to create the macro construction.
In the upper toolbar, click on icon ![]() . This make appear more tools in the upper toolbar.
. This make appear more tools in the upper toolbar.
The purpose of icon  is the creation of the construction.
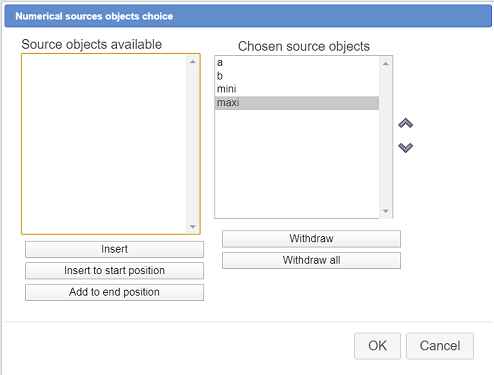
Click on this icon and choose item Numerical sources object choice.
A dialog box pops up. Use button Insert to choose the numerical sources objects a, b, min and max as shown underneath and validate (yoy can use double clicks).
Then you must define the graphical sources objects.
Click on icon and choose l’item Graphical sources objects choice.
Click on point O, the on point I and the point at the left edge of the cursor (using this point is necessary because our final objects will depend on it).
Clcik on the red button STOP (bottom right corner of the window) to indicate that the graphical sources objects choice is finsihed.
Click again on icon and choose item Graphical final objects choice.
First click on the point at the left edge of the cursor.
A dialog box pops up asking if you really want this free point to become a final object. Confirm by OK.
Now we have to specify the final objects (which are all graphical here) : click first on the first object locus (locus of points) the on the second one (locus of LaTeX displays).
Click on the red button STOP to indicate the graphical final objecst choice is done.
Before the finalization of our construction we are going to hide the left extremity of our cursor. Indeed we have asked him to become a final object but we don’t want it to be visible when the construction will be implemented
Use tool  to mask this point (it is a free point)
All we have to do now is finish our construction.
Click again on icon and choose item Finish current construction.
A dialog box pops up. Fill it as shown here :
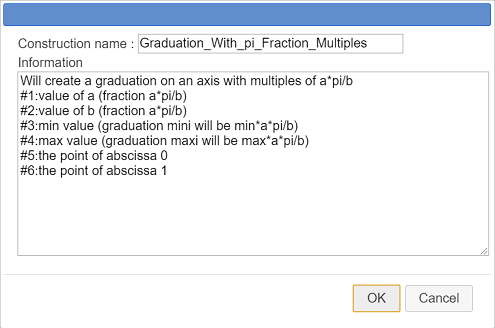
Here is the code to use in the Information edit box :
Will create a graduation on an axis with multiples of a*pi/b
#1:value of a (fraction a*pi/b)
#2:value of b (fraction a*pi/b)
#3:min value (graduation mini will be min*a*pi/b)
#4:max value (graduation maxi will be max*a*pi/b)
#5:the point of abscissa 0
#6:the point of abscissa 1
The last six lines of the information edit box contain informations that will be given to the user when choosing each source object durint the implementation of the construction.
You can again save your figure, your construction is now part of it.
But it is also better to save the construction itself in a mgc file.
For this, use icon and item Save a construction of the figure.
Browse to the wished directory, choose a name for the file (it is better if the name is similar to the construction name) and validate.
If necessary you can download the construction in this zip file :

For instance create with a new figure with an orthognal frame, with radian angle unity, checking the checkbox Without graduations.
To use this construction in a figure, we must first incorporate this construction in the figure.
Use icon and choose item Incorporate construction form file.
Browse to the directory containing the mgc file the construction is saved in then click on button Open.
The construction is now part of your figure.
Use and choose item Implement construction of the figure.
La construction est déjà sélectionnée. Cliquez sur le bouton Implémenter.
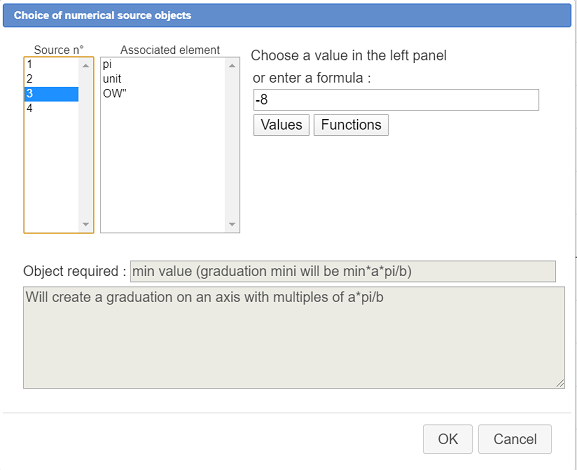
A dialog box pops up asking for the 4 numerical sources objects. For each of them
Enter the following formulas :
| Source object n° | Formula | Explanation |
| 1 | 1 | It is the numerator of the fraction of pi |
| 2 | 4 | It is the denomerator of the fraction of pi |
| 3 | -8 | The minimum graduation will be -8*pi/4 = -2pi |
| 4 | 8 | The maximum graduation will be 8*pi/4 = 2pi |
For instance here we are enterint a formula for the source object n°3 :
Just after the validation of this dialog box, you are asked in the top right corner to click on the point of abscissa 0 : click on the frame origin.
Then you are asked to click on the point of abscissa 1 : click on point I.
The graduation appears.
Let us now use the same construction to add graduations to the y-axis with fractions of pi/3.
Use again and choose item Implement construction of the figure and proceed in the same way.
| Source object n° | Formula | Explanation |
| 1 | 1 | It is the numerator of the fraction of pi |
| 2 | 3 | It is the denominator of the fraction of pi |
| 3 | -6 | The mini graduation will be -6*pi/3 = -2pi |
| 4 | 6 | The maxi graduation will be 6*pi/3 = 2pi |
When you are asked to click on the point of avscissa 0, click on point O and when asked to click on the point of abscissa 1 click on point J.
The graduation appears but something is wrong : the alignment of the LaTeX displays.
In the upper toolbar, click on icon  then click on one of the LaTeX displays of the last garduation (in fact this is an object locus).
A dialog box appears. Change the alignment options as shown here and validate :
You can even use tool  to grab the graduations.
Here is the final figure (you can modify the graduations and implement agait the construction) :
 Accueil
 Présentation
 FAQ
FAQ Contact